One line of code at a time: How I built an AI web translator app with Azure cognitive services and Flask
Introduction
As my final entry into the hashnode #4articles4weeks writeathon, I am elated that this entry encapsulates the essence of the three entries. In my first entry, I wrote about my society and its need for AI solutions with respect to how that made me want to be a software developer. I followed that up with my second entry where I wrote an inspirational anecdote on how Microsoft inspires me to be better with their core values and products. In my third entry, I wrote on how Artificial Intelligence can be revolutionary in solving the healthcare social problem. In this entry, in line with my dedication to sharing knowledge with the community, I seek to educate readers on how to build an AI web translator to translate between over sixty languages with Azure cognitive services and Flask.
Prerequisites
You will need to have a basic knowledge of Python.
You will need to have a fundamental understanding of HTML.
You will need a valid and active Microsoft Azure account.
Free Azure Trial: With this option, you will start with $200 Azure credit and will have 30 days to use it in addition to free services.
Azure for Students: This offer is available for students only. With this option, you will start with $100 Azure credit with no credit card required and access to popular services free whilst you have your credit.
Step 1 - Setup your environment
To get started writing your Flask application with Python, you need to set up your development environment, which will require a couple of items to be installed. To do this, you will need to create a directory for your code, create a virtual environment and install Flask along with other libraries.
The directory will be created in a local location of your choice. This directory will be your project directory and will contain all the code you will write. You can create a directory from a command or terminal window with one of the following commands:
# Windows
md contoso
cd contoso

## macOS or Linux
mkdir contoso
cd contoso
With your directory created, you will then create a virtual environment. A virtual environment is a folder that contains all the libraries you need to run your application, including the Python runtime itself. By using a virtual environment, you make your applications modular, allowing you to keep them separate from one another and avoid versioning issues. As a best practice, it is advised that one should always use virtual environments when working with Python.
To use a virtual environment, not only will you create one, but you will also activate it. It can be created using the venv module, which is installed as part of Python's installation.
# Windows
# Create the environment
python -m venv venv
# Activate the environment
.\venv\scripts\activate

# macOS or Linux
# Create the environment
python -m venv venv
# Activate the environment
source ./venv/bin/activate
Finally, to complete the environment setup, you will install Flask and other needed libraries. You will install Flask by creating a requirements.txt file. The requirements.txt file is a text file where you list the libraries required for your application. It is the convention typically used by developers that makes it easier to manage applications where numerous libraries exist as dependencies. Although you will not use a couple of the other libraries until the proceeding steps, you will install them now.
Open the folder in Visual Studio Code.
Create a new file.
Name the file
requirements.txt, and add the following text:
flask
python-dotenv
requests
Save the file by clicking Ctrl-S, or Cmd-S if you are using MacOS
Return to the command or terminal window and perform the installation by using pip to run the following command:
pip install -r requirements.txt
This command will download the necessary libraries and their dependencies.
Step 2 - Create the app
Having set up the environment, in this step, you will create your core application, add the route to your application, create the HTML template for your site and then test that the application is running correctly. Usually, the entry point for Flask applications is a file named app.py. You will follow this convention and create the core of your application.
You will return to the instance of Visual Studio Code you were using previously, create a new file named app.py by clicking New file in the Explorer tab.

Thereafter, you will add the code to create your Flask application
from flask import Flask, redirect, url_for, request, render_template, session

app = Flask(__name__)
The import statement includes references to Flask, which is the core of any Flask application and render_template which you will use in a while when you want to return your HTML page. app will be your core application. You will use it when you register your routes in the following step (i.e. add the route for our application). Your application will use one route - /. This route is such that it is the one that will be used if the user doesn't provide anything beyond the name of the domain or server.
Thereafter, you will add the following code to the end of app.py
@app.route('/', methods=['GET'])
def index():
    return render_template('index.html')
By using @app.route, you have indicated the route you want to create. The path will be /, which is the default route. By virtue of the code, you indicated this will be used for GET. If a GET request comes in for /, Flask will automatically call the function declared immediately below the decorator (i.e. index in your case). In the body of index, you then indicated that you would return an HTML template named index.html to the user. Before touching on how to create the HTML template for your site, it is worthy of note that Jinja is the templating engine for Flask, and it focuses quite heavily on HTML.
At this point, templates for Flask need to be created in a folder named templates, which I personally think is fitting. You will create the folder, the necessary file, and add the HTML.
Create a new folder named
templatesby selectingNew Folderin theExplorertool in Visual Studio Code.Thereafter, select the
templatesfolder you created, and selectNew Fileto add a file to the folder.Afterwards, name the file
index.html.Finally, add the following HTML.
<!DOCTYPE html>
<html lang="en">
<head>
  <meta charset="UTF-8">
  <meta name="viewport" content="width=device-width, initial-scale=1.0">
  <link rel="stylesheet" href="https://cdn.jsdelivr.net/npm/bootstrap@4.5.3/dist/css/bootstrap.min.css"
      integrity="sha384-TX8t27EcRE3e/ihU7zmQxVncDAy5uIKz4rEkgIXeMed4M0jlfIDPvg6uqKI2xXr2" crossorigin="anonymous">
  <title>Translator</title>
</head>
<body>
  <div class="container">
      <h1>Translation service</h1>
      <div>Enter the text you wish to translate, choose the language, and click Translate!</div>
      <div>
          <form method="POST">
              <div class="form-group">
                  <textarea name="text" cols="20" rows="10" class="form-control"></textarea>
              </div>
              <div class="form-group">
                  <label for="language">Language:</label>
                  <select name="language" class="form-control">
                      <option value="en">English</option>
                      <option value="it">Italian</option>
                      <option value="ja">Japanese</option>
                      <option value="ru">Russian</option>
                      <option value="de">German</option>
                  </select>
              </div>
              <div>
                  <button type="submit" class="btn btn-success">Translate!</button>
              </div>
          </form>
      </div>
  </div>
</body>
</html>
The core components in the HTML above are the textarea for the text the user wishes to translate, and the dropdown list (i.e. select), which the user will use to indicate the target language.
At this point, with your initial site created, you can test it. To do this, open your terminal and run the following command to set the Flask runtime to development. This implies that each time there is a change, the server will automatically reload.
# Windows
set FLASK_ENV=development

# Linux/macOS
export FLASK_ENV=development
And then, run the application!
flask run
After running the command above, open the application in a browser by navigating to http://localhost:5000. You should see the form displayed. Congratulations!
Step 3 - Create the Translator service
Once the project is up and running, you will create the necessary services on Azure, obtain the necessary keys to call the service and then, safely store them in a .env file.
Browse to the Azure portal
Select
Create a resource

In the
Searchbox, enterTranslatorSelect
Translator

- Select
Create

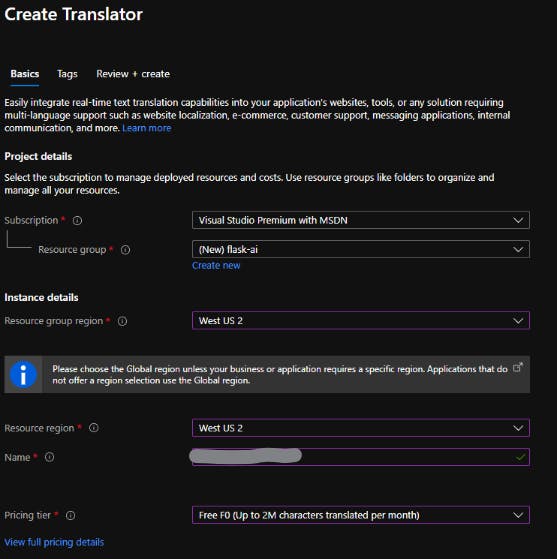
- Complete the Create Translator form with the following values:
Subscription: Your subscription
Resource group:
Select Create new
Name: flask-ai
Resource group region: Select a region near you
Resource region: Select the same region as above
Name: A globally unique value, such as ai-web-translator-your_name
Pricing tier: Free F0

Select
Review + createSelect
CreateAfter a few moments, the resource will be created
Select
Go to resourceSelect
Keys and Endpointon the left side underRESOURCE MANAGEMENTNext to
KEY 1, selectCopy to clipboard

Note: There's no difference between KEY 1 and KEY 2. By providing two keys you could migrate to new keys, by regenerating one while using the other.
Take note of the text translation and location values
Create a
.envfile to store the keyReturn to Visual Studio Code and create a new file in the root of the application by selecting
New fileand naming it.envPaste the following text into
.env
KEY=your_key
ENDPOINT=your_endpoint
LOCATION=your_location
- Replace the placeholders
your_key with the key you copied above your_endpoint with the endpoint from Azure your_location with the location from Azure
At this point, your .env file should look like the following (with your values):
KEY=00d09299d68548d646c097488f7d9be7
ENDPOINT=https://api.cognitive.microsofttranslator.com/
LOCATION=westus2
Step 4 - Call the service from the app
As one of the last steps in building the AI web translator app with Azure cognitive services and Flask, you will add the code to call the Translator service and then create the template to display results. Now, you will add a couple of required imports for the libraries you will use, followed by the new route to respond to the user to the app.py file.
At the very top of app.py, add the following lines of code:
import requests, os, uuid, json
from dotenv import load_dotenv
load_dotenv()
The top line will import libraries that you will use later when making the call to the Translator service. You will also import
load_dotenvfromdotenvand execute the function, which will load the values from.env.At the bottom of app.py, you will then add the following lines of code to create the route and logic for translating text:
@app.route('/', methods=['POST'])
def index_post():
    # Read the values from the form
    original_text = request.form['text']
    target_language = request.form['language']

    # Load the values from .env
    key = os.environ['KEY']
    endpoint = os.environ['ENDPOINT']
    location = os.environ['LOCATION']

    # Indicate that we want to translate and the API version (3.0) and the target language
    path = '/translate?api-version=3.0'
    # Add the target language parameter
    target_language_parameter = '&to=' + target_language
    # Create the full URL
    constructed_url = endpoint + path + target_language_parameter

    # Set up the header information, which includes our subscription key
    headers = {
        'Ocp-Apim-Subscription-Key': key,
        'Ocp-Apim-Subscription-Region': location,
        'Content-type': 'application/json',
        'X-ClientTraceId': str(uuid.uuid4())
    }

    # Create the body of the request with the text to be translated
    body = [{ 'text': original_text }]

    # Make the call using post
    translator_request = requests.post(constructed_url, headers=headers, json=body)
    # Retrieve the JSON response
    translator_response = translator_request.json()
    # Retrieve the translation
    translated_text = translator_response[0]['translations'][0]['text']

    # Call render template, passing the translated text,
    # original text, and target language to the template
    return render_template(
        'results.html',
        translated_text=translated_text,
        original_text=original_text,
        target_language=target_language
    )
Although the code is commented to describe the steps, at its core, here's what your code does:
Reads the text the user entered and the language they selected on the form
Reads the environmental variables you created earlier from your .env file
Creates the necessary path to call the Translator service, which includes the target language (the source language is automatically detected)
Creates the header information, which includes the key for the Translator service, the location of the service, and an arbitrary ID for the translation
Creates the body of the request, which includes the text you want to translate
Calls
postonrequeststo call the Translator serviceRetrieves the JSON response from the server, which includes the translated text
Retrieves the translated text (see the following note)
Calls
render_templateto display the response page.
With that done, you will then create the HTML template for the results page.
Create a new file in templates by selecting templates in the Explorer tool in Visual Studio Code. Then select
New file.Name the file
results.htmlAdd the following HTML to
results.html
<!DOCTYPE html>
<html lang="en">
<head>
    <meta charset="UTF-8">
    <meta name="viewport" content="width=device-width, initial-scale=1.0">
    <link rel="stylesheet" href="https://cdn.jsdelivr.net/npm/bootstrap@4.5.3/dist/css/bootstrap.min.css"
        integrity="sha384-TX8t27EcRE3e/ihU7zmQxVncDAy5uIKz4rEkgIXeMed4M0jlfIDPvg6uqKI2xXr2" crossorigin="anonymous">
    <title>Result</title>
</head>
<body>
    <div class="container">
        <h2>Results</h2>
        <div>
            <strong>Original text:</strong> {{ original_text }}
        </div>
        <div>
            <strong>Translated text:</strong> {{ translated_text }}
        </div>
        <div>
            <strong>Target language code:</strong> {{ target_language }}
        </div>
        <div>
            <a href="{{ url_for('index') }}">Try another one!</a>
        </div>
    </div>
</body>
</html>
If you look at the code, you'll notice that you accessed original_text, translated_text, and target_language, which you passed as named parameters in render_template by using {{ }}. This operation tells Flask to render the contents as plain text. You also used url_for('index') to create a link back to the default page. While you could technically type in the path to the original page, using url_for tells Flask to read the path for the function with the name you provide (i.e. index in this case). If you rearrange your site, the URL generated for the link will always be valid.
Step 5 - Test your application
Finally, you will finish by testing the application to see text translated in your app!
Use Ctrl-C to stop the Flask application
Execute the command flask run to restart the service
Browse to localhost:5000 to test your application
Enter text into the text area, choose a language, and select Translate
Conclusion
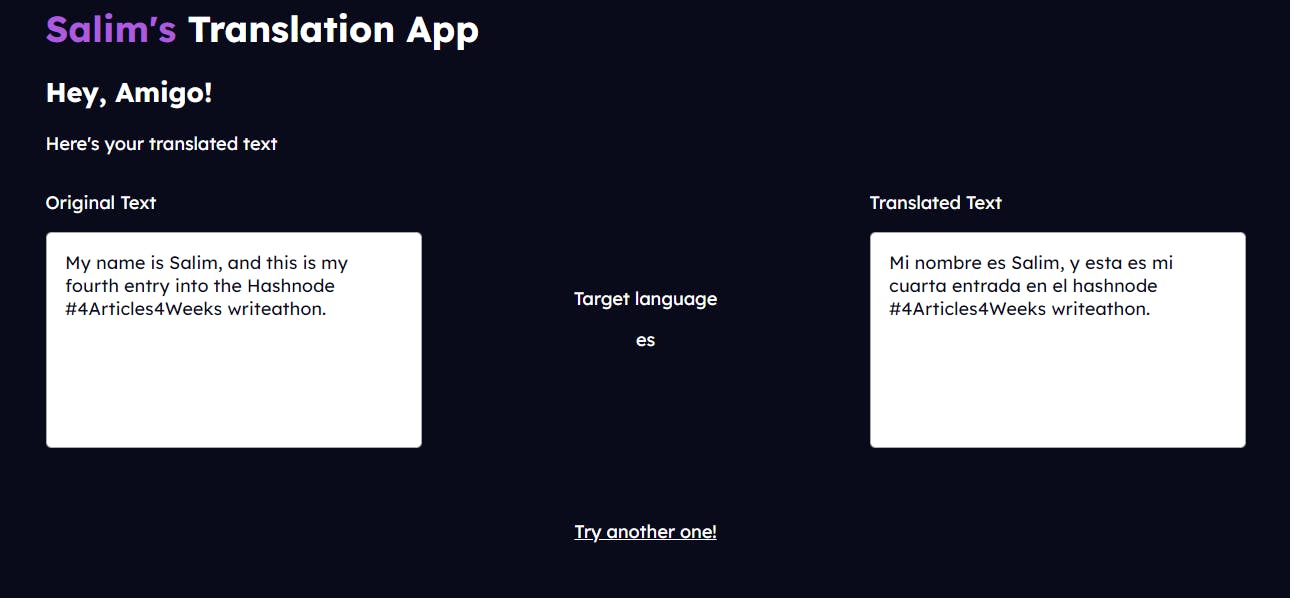
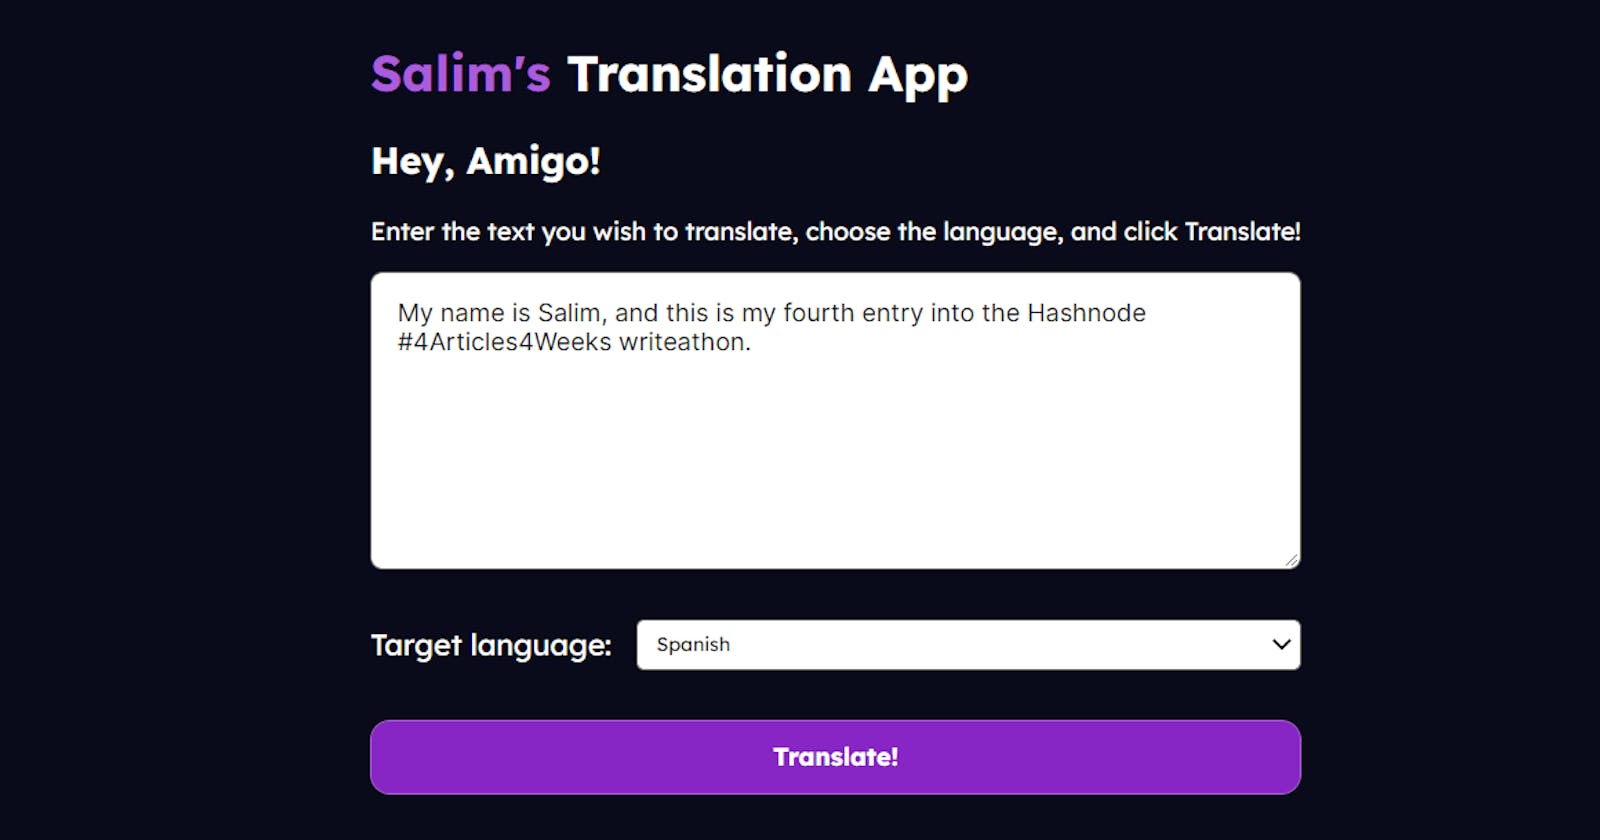
Although this tutorial is limited to working with the app locally, I have taken the liberty (as you can as well) of deploying the app as an Azure web app. The link to the app (deployed) can be found here.


You will notice that the image here is more 'fancy' than the 'functional' one you created from following the tutorial. This is because styles were added using Cascading Style Sheets. To do this, you can simply add a style.css file to the `templates folder.
If you have finished learning, you can delete the resource or resource group from Azure subscription. The Azure resources that you created in this tutorial can incur ongoing costs. To avoid such costs, it is important to delete the resource or resource group that contains all those resources. You can do that by using the Azure portal.
Navigate to the Azure portal.
Navigate to the resource group that contains your Azure Databricks instance.
Select
Delete resource group.Type the name of the resource group in the confirmation text box.
Select
Delete.
